
 Svenska


Remote Control and IoT Automation with Waveshare Luckfox PicoKVM – The Future of Smart Management Systems
At HiTechChain, we work with the latest technologies in AI, IoT, and cloud solutions.
One of our most exciting projects right now is based on the Waveshare Luckfox PicoKVM – a compact yet powerful platform that enables remote control, monitoring, and automation in entirely new ways.
In this post, we will show how PicoKVM can be applied in education, lab environments, and industrial projects – from simple remote access to advanced AI-driven automation.
Project Idea: Remote Lab Server with PicoKVM
Students build a system where they can remotely control a development computer or lab server via the web.
This includes:
Video output streaming (HDMI ? PicoKVM ? browser)
Keyboard and mouse commands over the network
Virtual USB device mounting for file/ISO access
Power ON/OFF and reset via GPIO
A dashboard for system status, IP address, and logs
Secure authentication and access control
Functional Requirements
Live video from the host computer (HDMI ? PicoKVM ? browser)
Keyboard & mouse commands sent via network to the host
Virtual USB storage mounting for files or OS installation
Power/reset control via GPIO on PicoKVM
Dashboard showing IP address, status, and logs
Secure access with authentication and role-based permissions
Project Plan (4–5 Weeks)
Week 1 – Research & Planning
Study PicoKVM specifications
Create a system diagram
Plan APIs and interfaces
Week 2 – Basic Integration
Connect HDMI/USB between host and PicoKVM
Verify video streaming and HID input over network
Week 3 – Backend & API Development
Build an API (e.g., with Python Flask/FastAPI or Node.js)
Connect API to PicoKVM via web service
Week 4 – Frontend & Dashboard
Develop a web UI to display video feed and control buttons
Add power management controls
Week 5 – Security, Testing & Documentation
Implement authentication and role-based access
Test with multiple clients and remote WAN access
Write project report and present demo
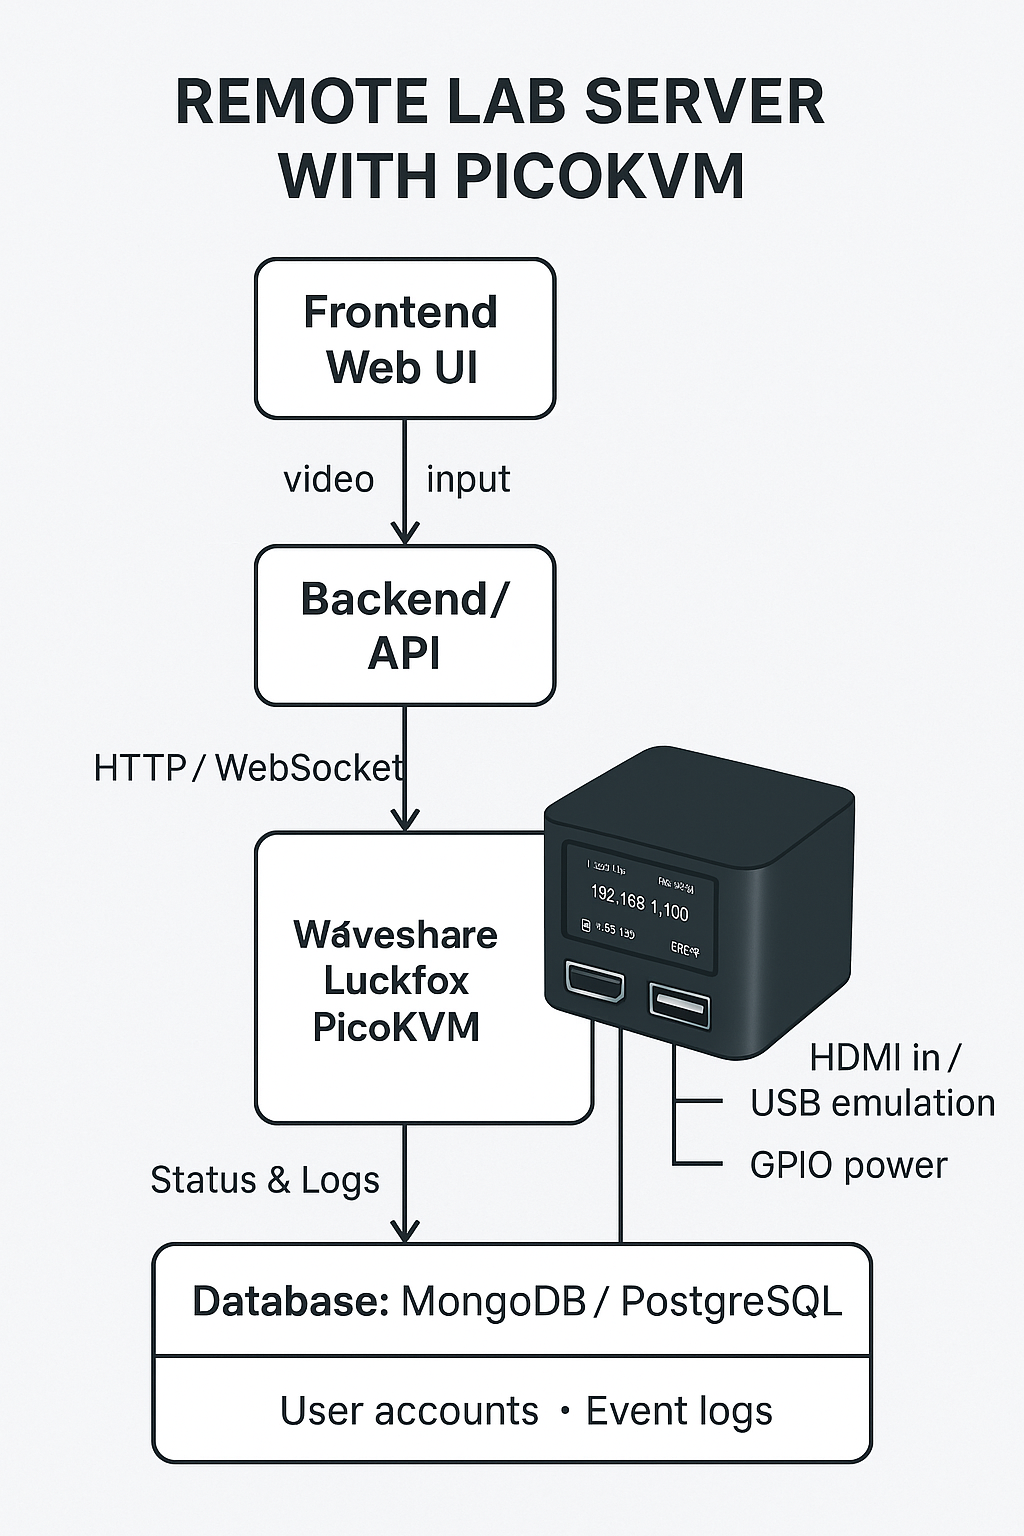
Structural Architecture (System Diagram)
[Frontend Web UI]
video / input
[Backend API]
HTTP / WebSocket
PicoKVM
HDMI in / USB emulation / GPIO power
Status & Logs
[Database: MongoDB / PostgreSQL]
• User accounts
• Event logs
- Authentication & session management
- Dashboard with video feed and system logs
Suggested Tech Stack
Backend: Python (Flask/FastAPI) or Node.js + Express
Frontend: Vue.js / React or lightweight web app
Database: MongoDB Atlas or PostgreSQL
Authentication: JWT, OAuth, role-based access control
Communication: WebSockets for video/input streams
Security: TLS/HTTPS, firewall rules, secure authentication
Exercises / Milestones
Connect HDMI + USB to PicoKVM and verify video + input over the network
Build API endpoints (e.g., “get video stream URL” / “send key press”)
Create dashboard showing live video and control buttons
Add power control (ON/OFF) via GPIO
Log events (key presses, power cycles) into database
Implement secure login and role-based access
Test WAN access via secure VPN (e.g., Tailscale/ZeroTier)
Learning Outcomes for Students
Understand how IP-KVM technology works at the hardware/software level
Work with real-time data streams (video + HID input)
Build APIs and frontends for remote system management
Learn about security challenges in remote access systems
Gain experience in hardware-software integration
? This project blends practical IT skills with modern IoT/edge computing concepts and is ideal for technical education in schools, universities, or innovation labs.